


Istvan, HA5CLF / N9EU
The following forum (http://elecraft.365791.n2.nabble.com/KX3-and-the-Sigmalink-USB-td7652838.html) explains how to make your own SLMODKX3. But, why not just use the three jumper wires provided by Trigetronics so it is done with?
Since the SLMODKX3 jumper module uses a DC blocking capacitor, using only the provided jumper wires you will need to turn off the MIC BIAS in the KX3 rig, and of course turn it back on when operating SSB rather than DIGI. This is an unnecessary bother. It took me quite a while to figure out why my transceiver did not put out any power in the SSB mode.
This is where one may find the various jumper arrangements: https://static.dxengineering.com/global/images/instructions/tgr-sl-cab13i.pdf
If instead of using the SLMODKX3 module the wiring is as follows:

The aforementioned forum explains how to deal with the DC blocking capacitor: “If you look at the jumper configuration in Fig 2 & 3 of the Signalink USB documentation, you can insert the capacitor, in place of the jumper, between the MIC pin on JP1 and the corresponding Mic Input terminal on JP1. A 0.1 micro-farad 50 V disk ceramic should be very adequate. That will block the DC bias from the radio and keep it from saturating the output transformer T2.” To understand what he talks about, you may want to look at the schematic of the Signalink USB as well:
http://www.frenning.dk/OZ1PIF_HOMEPAGE/images/Tigertronics%20Signalink%20USB%20Schematic%20v1p2.pdf
However, for us it is enough to deal with the 16-pin connector where the SLMODKX3 would be plugged in:
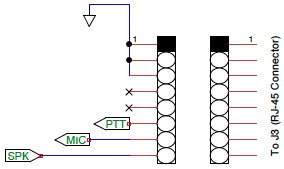
So, based on the above description here is where the DC blocking capacitor needs to be connected and this is how it looks completed:

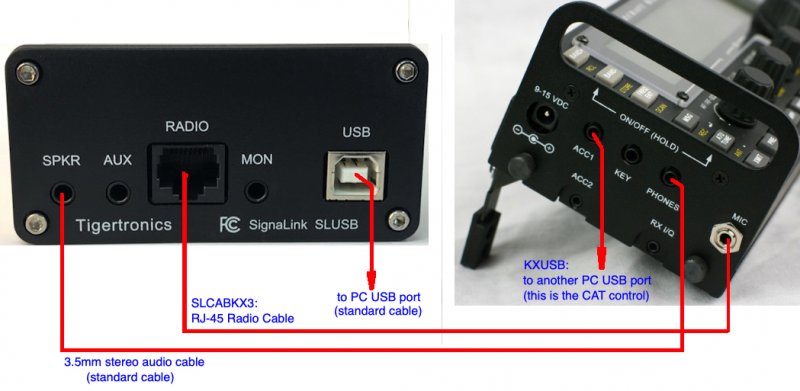
By the way, I did not have a 16-pin, but only a 14-pin socket. It does not matter as long as the right pins are covered. Anyway, now we need to hookup the Signalink USB to the KX3 and the PC:
and configure the KX3 transceiver: Press the right lower “DISP” button on the transceiver for more than a second, which will bring up the configuration display, and rotate the offset button above it to find the appropriate parameters:
AFX MD: set it to OFF
MIC BIAS: set it to ON if you performed this modification with the blocking capacitor or if you used the original SLMODKX3 plugin. In case you only used the jumper wires as provided by Trigetronics, set it to OFF.
MIC BIN: set it to Ptt or Ptt Up.dn, but definitely not OFF
This concludes the setup of the Signalink USB with the KX3 transceiver. You are ready to use your favorite digi software. What I use is the WSJT-X software, so I am going to show you how I configured it.
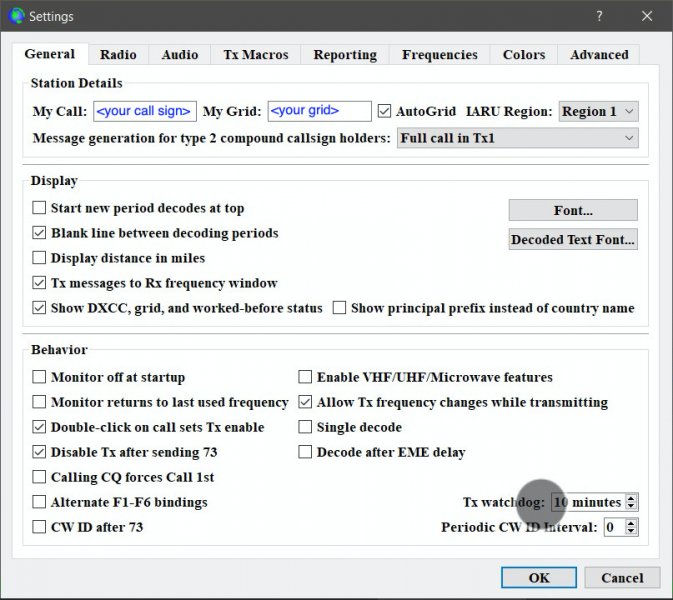
How did I set up the WSJT-X software to make CAT control work as well as the Signalink USB interface? I did it with lots of frustration and trials and errors. However, finally after hours of frustration I got it to work. The reason I write this up is, that I remember how it should be set up in case I disassemble it and forget what made it tick. So, let me show you the first configuration tab:
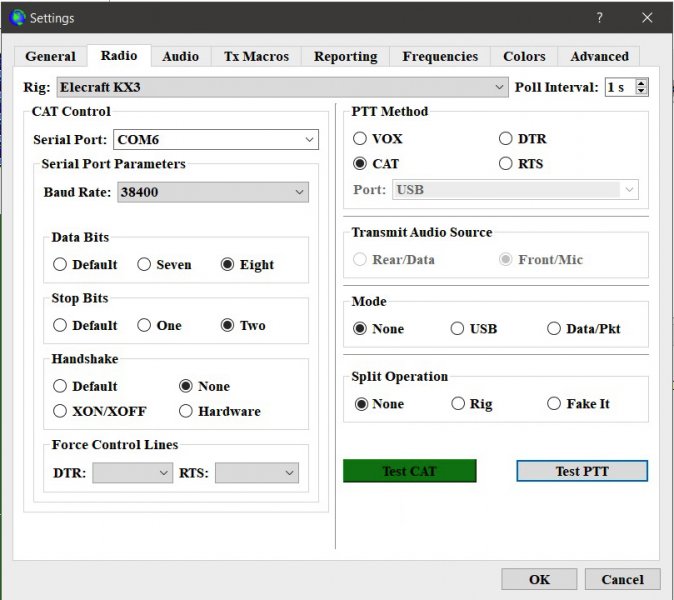
What may be different on your screen is, which serial port you select. Even though the KXUSB cable is plugged into a USB port on your PC, it requires a serial COM port to be chosen. Try each of the COM ports that show up in your “Serial Port:” menu. After each selection press the “Test CAT” button and wait for response, that may take several seconds. I was getting plenty of error messages, until finally the button lit up GREEN. Then I pressed the “Test PTT” button, it turned the transceiver on transmit mode while the button lit up RED. Make sure you have a dummy load connected to the KX3 although there is no audio, so power is not going out. Now that the CAT control works fine, let’s go to the next tab, the Audio.
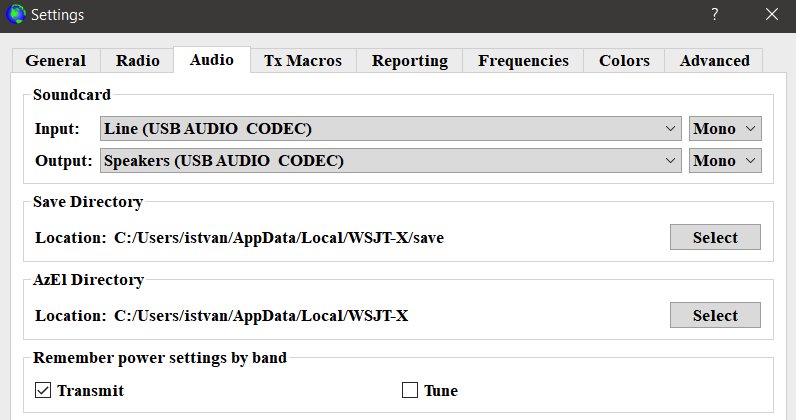
Here we need to set up the two USB ports for the Signalink USB internal sound card. Finally, I show the Main tab as well, since it needs to be set up also.
So, let’s meet on the air, 73 and GL.